
Measuring Capacitance
1. Aim
To measure capacitance connected between IN1 and GND, and study how geometry affects capacitance.
2. Apparatus / Components Required
- SEELab3 or ExpEYES-17 unit
- Capacitors of known values
- Connecting wires / crocodile clips
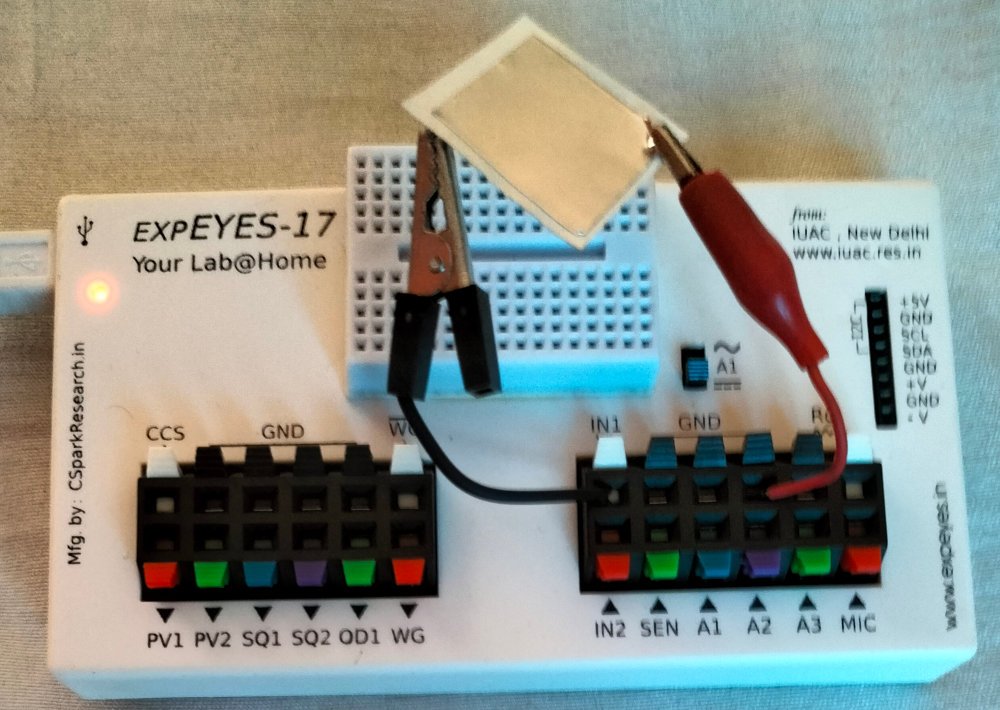
- Two foil plates + paper/plastic sheet (for homemade capacitor)
- PC/Laptop/Android phone with SEELab software
3. Theory & Principle
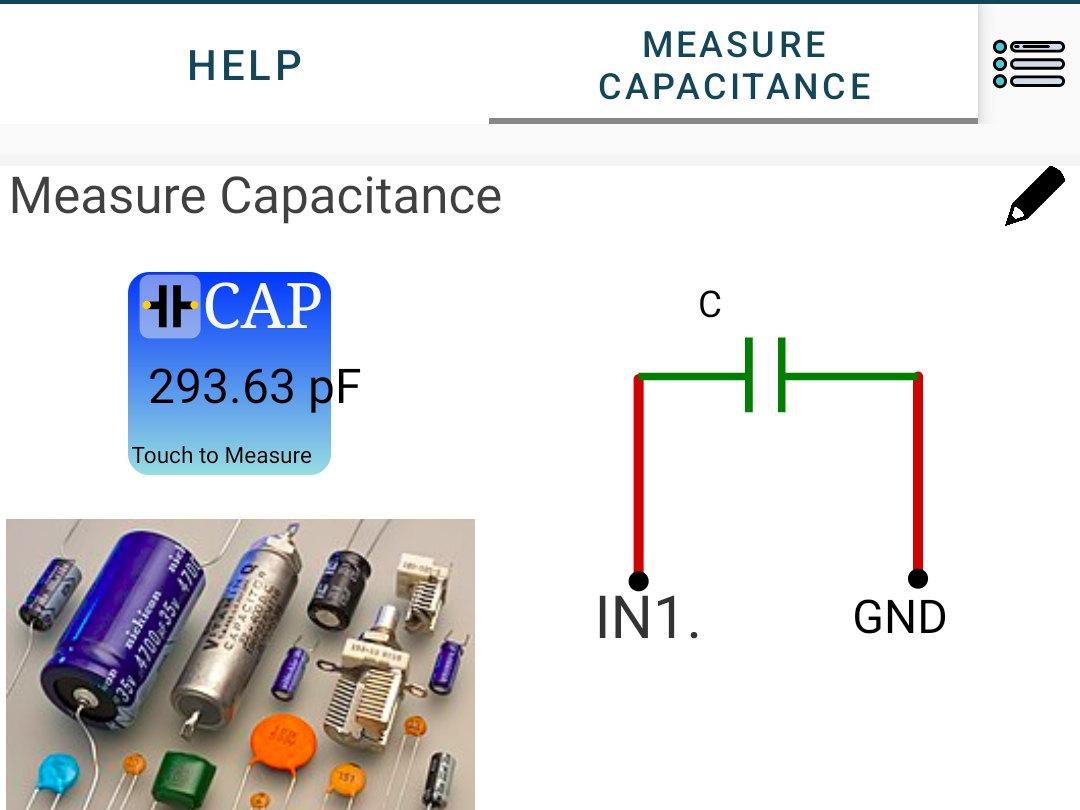
Capacitance is defined as: \(C=\frac{Q}{V}\)
SEElab measures small capacitances (pF and nF ranges) by charging with a constant current source and measuring the voltage rise produced. Q is the product of C and V, and Q can be calculated as a product of this constant current and the time spent charging.
For a parallel-plate capacitor:
\(C\propto\frac{A}{d}\)
More explicitly (same dielectric):
\(C = \epsilon \frac{A}{d}\)
where A is plate overlap area and d is separation.
For larger values, it charges the capacitor via a built-in 10K resistor whilst simultaneously capturing the capacitor voltage using the oscilloscope. All this magic happens internally, and the capacitance value is extracted after fitting the charging curve to an appropriate function to extract the time constant.
Mobile App
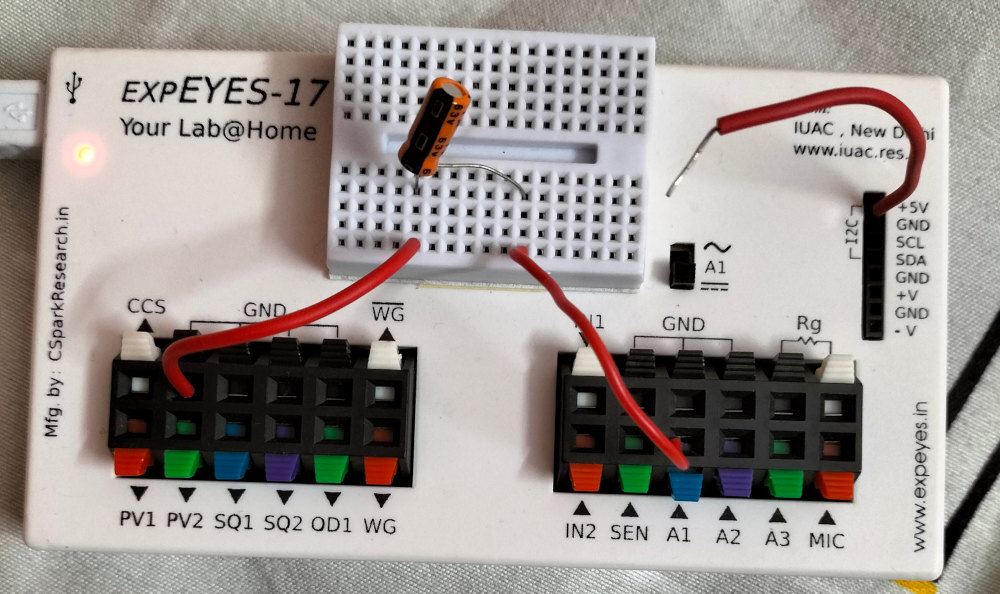
Photo with ExpEYES17
4. Circuit Diagram / Setup
- Connect capacitor between
IN1andGND. - Open the “Measure Capacitance” tool and trigger measurement.
- Repeat with different capacitors.
5. Procedure
- Measure known capacitors and record values.
- Build a parallel-plate capacitor using foil-paper-foil.
- Measure capacitance for full overlap.
- Reduce overlap area gradually and re-measure.
- Compare trends in measured values.
6. Observation Table
| Capacitor Type | Expected Value | Measured Value | Remarks |
|---|---|---|---|
| Ceramic (nominal) | |||
| Electrolytic (nominal) | |||
| Homemade plate capacitor (full area) | |||
| Homemade plate capacitor (reduced area) |
7. Advanced: Area Dependence Check
For same dielectric and separation: \(\frac{C_2}{C_1} \approx \frac{A_2}{A_1}\)
Example: if overlap area is reduced to half, measured capacitance should be approximately half.
8. Error Analysis
- Stray capacitance of wires and surroundings affects small-capacitance readings.
- Touching plates with fingers adds parallel leakage paths and body capacitance.
- Poor clip contacts and unstable setup can cause fluctuations.
9. Precautions
- Do not touch capacitor plates during measurement.
- Keep leads short for pF-range measurements.
- Ensure capacitor is discharged before reconnecting.
- Use firm clips and avoid movement while reading.
10. Troubleshooting
| Symptom | Possible Cause | Corrective Action |
|---|---|---|
| Reading too high | Stray/body capacitance | Keep hands away, shorten leads |
| Reading unstable | Loose connection/electrical noise | Tighten clips/remove nearby power cables |
| No reading | Wrong terminal | Ensure capacitor is between IN1 and GND |
Video Resource: https://www.youtube.com/embed/NMeqCf7tGmQ
11. Viva-Voce Questions
Q1. Why should you not touch capacitor plates while measuring?
Ans: Touch introduces leakage and extra capacitance, changing measured value.
Q2. How does capacitance change with plate overlap area?
Ans: Capacitance is directly proportional to overlap area.
Q3. What happens when plate separation increases?
Ans: Capacitance decreases because $C$ is inversely proportional to separation.