Experiment: Transduction of Sound Waves
1. Aim
To study the conversion of electrical energy into sound energy using a piezoelectric buzzer and the conversion of sound energy back into electrical energy using a condenser microphone.
2. Apparatus / Components Required
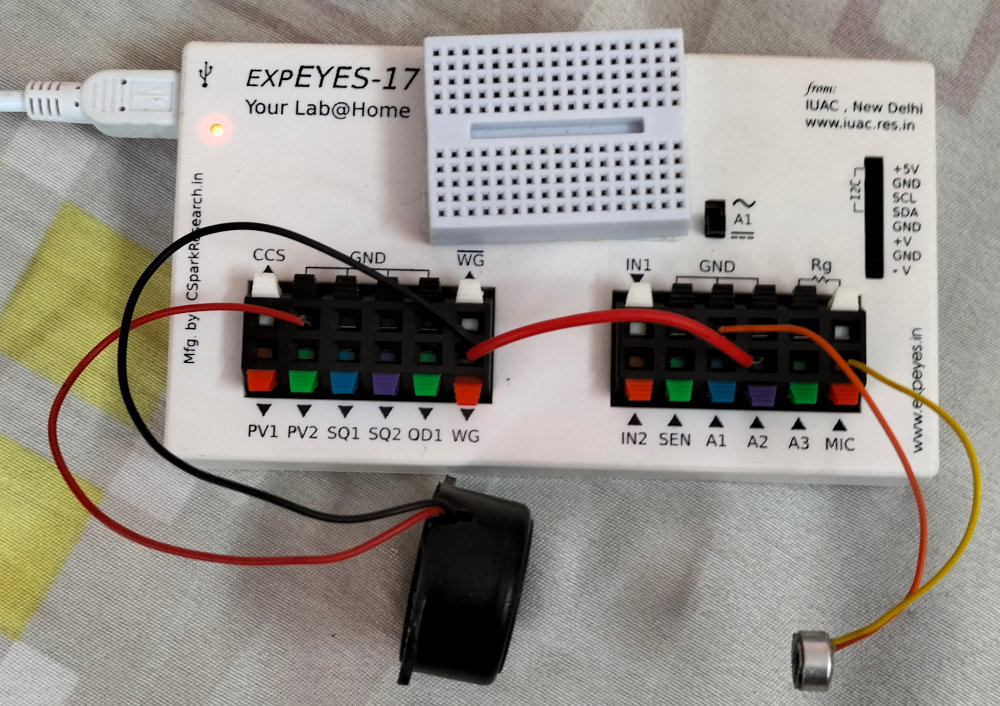
- SEELab3 or ExpEYES-17 unit
- One Piezoelectric Buzzer
- One Electret Condenser Microphone
- Connecting wires
- A whistle or tuning fork (optional)
- PC or Smartphone with SEELab3 software
3. Theory & Principle
Sound is a mechanical wave that requires a medium to travel. The devices that convert energy from one form to another (like electrical to mechanical) are called Transducers.
- Piezoelectric Buzzer (Output Transducer): Works on the Inverse Piezoelectric Effect. When an AC voltage is applied to a piezoelectric material, it deforms mechanically, vibrating the air and creating sound waves at the same frequency as the electrical input.
- Condenser Microphone (Input Transducer): Contains a thin diaphragm that acts as one plate of a capacitor. Sound waves cause the diaphragm to vibrate, changing the capacitance and generating a small varying electrical signal that mimics the sound wave’s pressure variations.
4. Circuit Diagram / Setup
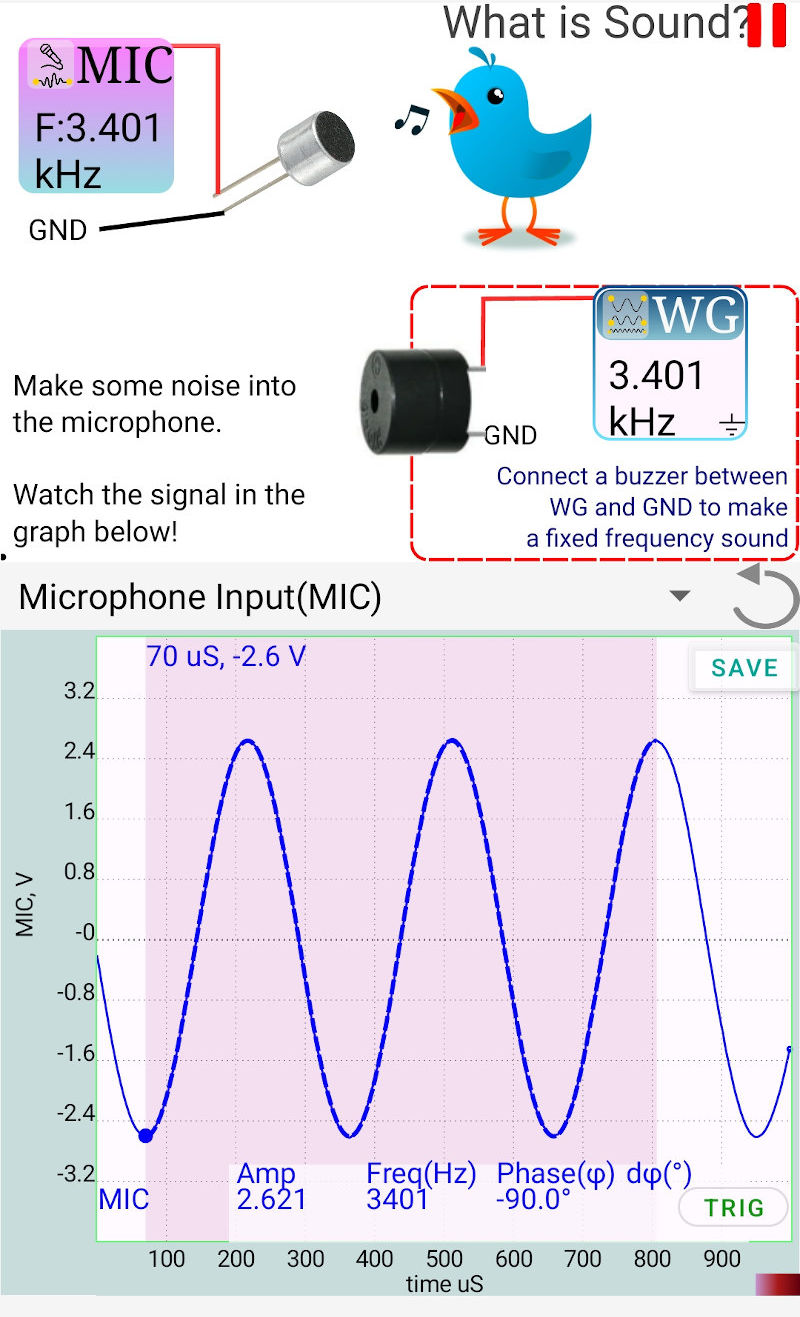
- Microphone: Connect the electret condenser microphone between the MIC terminal and GND. (Note: The MIC terminal provides the necessary DC bias for the microphone).
- Buzzer: Connect the piezoelectric buzzer between WG and GND.
- Placement: Align the microphone and buzzer so they face each other at a distance of about $5\text{ cm} - 10\text{ cm}$.
5. Procedure
- Open the SEELab3 software and select the “Oscilloscope” or “Sound” tool.
- Testing the Microphone: Enable the trace for the MIC channel. Speak into the microphone or whistle near it. Observe the complex electrical waveforms generated by your voice.
- Generating Sound: Set WG to a sine wave. Adjust the frequency to find the buzzer’s resonant point (usually around $3000\text{ Hz} - 4000\text{ Hz}$). At this frequency, the sound will be loudest and the trace on the oscilloscope will be most stable.
- Signal Capture: Observe the waveform on the MIC channel while the buzzer is sounding. Compare its frequency with the WG frequency.
- Distance Study: Move the buzzer further away and observe the decrease in the amplitude of the captured electrical signal.
6. Observation Table
| Source | Input Frequency (Hz) | Captured Waveform Shape | Peak-to-Peak Voltage (V) |
|---|---|---|---|
| Buzzer (WG) | |||
| Whistle | |||
| Voice |
7. Results and Discussion
- The piezoelectric buzzer successfully converted the AC electrical signal from WG into an audible sound wave.
- The condenser microphone converted the sound waves back into electrical signals, which were visualized on the oscilloscope.
- It was observed that the amplitude of the captured signal is highly dependent on the frequency and the distance between the source and the receiver.
8. Precautions
- Microphone Polarity: Electret microphones have polarity. Ensure the terminal connected to the casing is grounded.
- Avoid Clipping: If you shout too loudly into the microphone, the signal may “clip” (flatten at the top), leading to distortion.
- Buzzer Resonance: Piezo buzzers are very quiet outside their resonant frequency. Always check the datasheet or sweep the frequency to find the peak performance point.
9. Troubleshooting
| Symptom | Possible Cause | Corrective Action |
|---|---|---|
| No trace on MIC | Mic not connected . | Ensure use of the MIC port; MIC , GND pins. |
| Very weak sound | Frequency is far from 3kHz. | Adjust WG frequency in small steps until sound peaks. |
| Noisy waveform | Electrical interference. | Keep the microphone wires away from the laptop power brick. |
10. Viva-Voce Questions
Q1. What is the difference between a Transducer and a Sensor?
Ans: A transducer converts energy from one form to another (e.g., electrical to sound). A sensor is a type of transducer that specifically detects a physical property and provides a corresponding electrical output.
Q2. Why does the electret microphone require a connection to the 'MIC' port instead of A1?
Ans: Electret microphones contain an internal FET amplifier that requires a small DC supply (bias voltage) to operate. The 'MIC' port provides this power, whereas the A1/A2 ports are purely for measurement.
Q3. What is the 'Piezoelectric Effect'?
Ans: It is the ability of certain materials to generate an electric charge in response to applied mechanical stress. The *Inverse Piezoelectric Effect* is used in buzzers to generate mechanical vibration from an electric field.
Q4. Why does a whistle produce a cleaner sine wave than a human voice?
Ans: A whistle is a relatively pure tone with few overtones, resulting in a waveform close to a simple sine wave. The human voice is composed of many different frequencies and harmonics, resulting in a highly complex "jagged" waveform.
Q5. How can you use this setup to measure the speed of sound?
Ans: By measuring the time delay (phase shift) between the electrical signal sent to the buzzer (WG) and the electrical signal received by the microphone (MIC) as you move them apart by a known distance.